REVOLVER CLEANING
THE BASICS OF CLEANING, MAINTAINING AND PRESERVING YOUR PISTOL
Like all machines, pistols and revolvers require maintenance and lubrication. Since firing pistols deposits carbon, burned powder, and bullet fouling on the surfaces, these have to be cleaned off to prevent corrosion or wear. Lubricants are burned off or thrown off by firing, and many lubricants tend to evaporate, dry out, or run off critical working parts. Maintaining your expensive Colt is not difficult, nor does it have to be a complicated procedure.
There are any number of ways to clean your pistol, this is simply one that works well for most people. Use caution when taking advice on cleaning equipment and methods. You'll read or hear methods that promise to work faster or better and cheaper, but which can easily ruin a good Colt.
You should clean the gun as soon after firing as possible, and you need to protect the finish from corrosion caused by handling or carrying the gun.
Some people don't clean their guns very often and this can cause the finish and the mechanism to deteriorate. You can get away with not cleaning your Colt longer in a dry area like Arizona, but a damp area like Louisiana can cause a gun to rust in a matter of hours. Colt's are not cheap guns, and you need to protect your investment.
TOOLS AND SUPPLIES
A good cleaning kit doesn't have to cost a fortune, so there's really no need to try to save a few dollars by using home brewed expedient tools and chemicals. You'll hear a lot about various expedients on the internet, some of which are acceptable, some of which can ruin an expensive Colt. The problem is in determining which is which. Many people will swear by some process and may have had good luck using them. However, your results may vary, and they won't be standing by to offer a wad of money to buy you a new Colt if things fail to work out like they said they would.
The companies that make gun cleaning supplies have spent millions of dollars paying engineers and chemists to develop materials and chemicals that won't harm a gun when used as directed. Some people who've paid many hundreds of dollars for a fine Colt agonize over the most effective ammunition to use, the best holster, the best lubricant, the nicest grips..... then shove God knows what down the bore because someone on the internet or at the range said it's cheaper, and it works for them. This is most often a case of "Penny wise, Dollar foolish". You can never go wrong by using materials and chemicals that are specifically developed for use on firearms. You can damage or ruin a good gun with materials not made for use in guns.
Since no one seems to sells a really good, complete cleaning kit, most shooters build their own, buying individual tools to build a custom cleaning kit. By building your own kit, you get exactly what you want, and usually better quality equipment. Companies like Brownell's and Midway USA carry most of the better products. Here's a list of what a good basic cleaning and maintenance kit for Colt pistols would include.
A FISHERMAN'S TACKLE BOX
A tackle box to hold everything keeps everything in one place and prevents loss. A larger box allows adding other gear for other guns. Individual compartments can be labeled to identify what caliber or gun they're used for.
CLEANING RODS
Never cheat on buying good rods. Cheap cleaning rods can ruin a good barrel. Rods NOT to buy are aluminum or brass rods, or any screw-together jointed rods. The idea that a hard steel rod will damage a barrel and a soft aluminum or brass rod will not, is false. The exact opposite is true. A soft aluminum or brass rod will allow grit to embed into the soft metal, and this will act as an abrasive lapping rod on the delicate muzzle and bore. The softer rods are also more flexible and will bend and flex in the bore more than the better rods. These aluminum and brass rods are sold simply because they're cheap and people demand them in the belief that they're protecting their gun with the softer rod. A screw-together jointed rod always has at least a slight mis-match between sections. The joints form a sharp "step" that will catch on the muzzle and can quickly ruin a barrel.
The best rods are one-piece stainless steel rods, rods with a synthetic coating, or the new carbon fiber rods. The coated rods seem to be falling from favor because the coating is not durable and tends to get shaved off. Stainless steel is the most durable and popular. Many benchrest and accuracy rifle shooters are using the new carbon fiber rods. They won't allow grit to embed, and the carbon fiber rod is either perfectly straight or it's broken.
For pistols, you will need one rod for .22 bores and one for .38 and up. Using a .22 rod for larger bores will allow the rod to flex and rub on the bore and possible get bent. Most pistol rods will fit any barrel up to six inches, but if you have a longer barrel you'll need a special, longer rod. Good brands of rods are Dewey, which seems to be the most popular, Pro-Shot, Tipton, and Bore-Tech. When you buy a rod also buy a brass bore guide. This is a cone-shaped guide that slips over the rod and is pressed against the muzzle to prevent the rod from scraping or rubbing on the delicate rifling at the muzzle.
There are other types of bore cleaning devices. Many people use bore snakes. These are nylon cords with bronze bristles embedded in a short section. A section of the cord is soaked with bore solvent and the cord is pulled through the bore. The bore snake is a good, fast, temporary cleaning method for use in the field, but it will not do as good a cleaning job as a rod, brush, and patches. Possible problems are that every time you pull the snake through the bore, you're dragging the dirt and grit from previous times through your bore. Some people clean the snake by washing it, but there's a danger in cleaning and re-using a snake too many times. Washing causes the snake to deteriorate, and sooner or later the snake is going to break off inside the barrel. If you attempt to pull it back out, the other end may break off leaving you with a plugged bore and no way to get the snake out. The snake manufacturers have no recommended method of extracting a stuck snake. For these reasons, it's recommended to use the snake as a quick field cleaner and use a rod for major cleaning.
Another popular cleaning tool is the Otis Pull-Through kit. This a pull-through using a coated steel cable and special patch holders. This is a good kit and works well, and is small enough to carry in a pocket. However, like all pull-through cleaning tools, even the Otis can break, leaving you with an obstructed bore and no way to extract it.
CLEANING RODS. HARD STAINLESS STEEL WITH BRASS MUZZLE PROTECTORS

ROD PATCH HOLDERS.
Cleaning rod tips or patch holders usually come in a loop type that the patch is passed through to hold it, or the button tip type which pushes the patch through the bore. Which type you buy is up to you, most shooters eventually buy both types for use on revolvers or automatics. Buy brass tips. The plastic types tend to break, leaving the threaded portion stuck in your rod or the tip stuck in the bore.
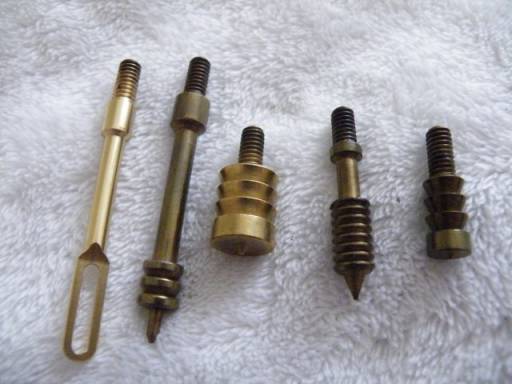
CLEANING PATCHES.
Since you'll use a lot of patches over time, it's best to buy them in bulk packages. Brownell's and Midway sell a variety of types in 500 to 1000 patch bags. Usually you'll need one size for .22 caliber pistols, and one size for .38 to .45 caliber pistols. There are round patches and square types. Which you buy is your choice.
BORE SOLVENT.
There are many brands and types of bore solvents. Bore solvents work by a chemical action that attacks copper and carbon fouling. It also helps loosen leading. In order to work, solvents need TIME. Some people make the mistake of running a solvent soaked patch down a bore, then immediately wipe it dry before the solvent has time to work.
Some are more effective at removing heavy copper bullet fouling but are more harsh and can damage the bore if left in too long. Since pistols seldom have problems with heavy copper bullet fouling, these solvents may not be needed. Hoppe's Number 9 solvent has been used by shooters since 1903. It does a good job, and won't harm the bore. It can be safely left in a barrel indefinitely so if you have a really dirty bore it can be allowed to soak overnight. Some new solvents are foaming types that seem to work very well. What solvent you choose is whatever seems to work for you. Try a few to find one you like.
In all cases with bore solvents, READ THE LABEL before using and use as directed.
Note that some solvents can damage nickel plated guns if allowed to soak on the plating. For nickel guns use a milder solvent like Hoppe's Number 9. Clean the gun as normal and wipe the solvent off as soon as the gun is clean. This is unlikely to damage a nickel plated pistol with a finish in good condition. A nickel finish that's worn or damaged may be more susceptible to damage caused by bore solvents. Cracks, chips, or spots worn through can allow the solvent to attack the finish.
BORE BRUSHES.
There are two main types of bore brushes: Phosphor Bronze, and synthetic. NEVER use stainless steel bore brushes. These are for a gunsmith to use on barrels so badly neglected, there's nothing to lose. The bronze brushes will do a better, faster job than synthetic, but being made of copper alloy, are attacked by the bore solvent. Synthetic brushes are not affected by bore solvents but aren't as effective. If you use bronze brushes, wash them off with soapy water or paint thinner after use to prevent solvent damage. Since no bore brush lasts long, buy them in bulk and throw them away as soon as they seem to be getting loose in the bore.
BRONZE BORE BRUSHES.
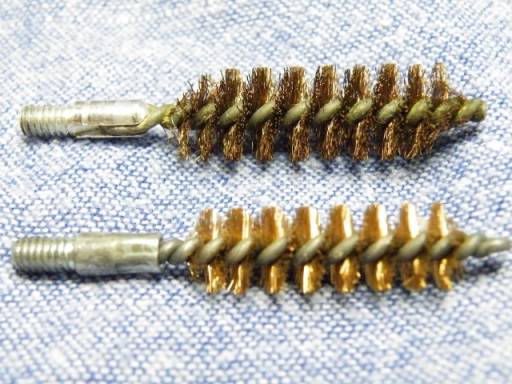
CHAMBER BRUSHES.
There are a number of methods of cleaning the chambers, but the fastest, easiest, and safest for your expensive Colt is to use a special bronze chamber brush. These are over-sized and have extra-stiff bristles. These work faster and better than using over-caliber bore brushes.
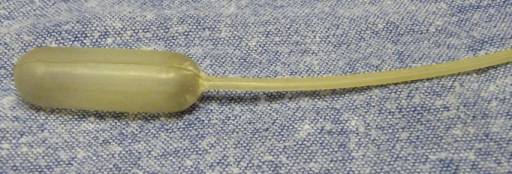
SOLVENT APPLICATION PIPETTE.
Since dipping brushes and patches into the solvent bottle contaminates the solvent, use a plastic pipette bulb to apply solvent where it's needed. Pipettes can be bought from laboratory supply houses or are sold by Accu-Bore bore solvent through Brownell's.
SOLVENT APPLICATION PIPETTE
BORE LIGHT OR MIRROR.
A bore light or a small mirror can be used for inspecting the bore and chambers.
BORE MIRROR
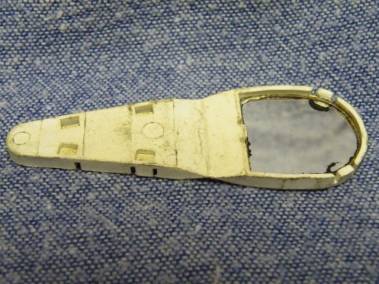
LEAD-AWAY CLOTH.
A "lead-away" cloth is a stiff, chemically treated cloth that removes leading and carbon deposits by rubbing the area. This is particularly effective at cleaning build up on cylinder faces. NEVER use these on a blued gun since it will strip the bluing off almost instantly. Use these on stainless steel guns, and very carefully on nickel plated guns. Lead-away cloths can also be cut into patches and used to remove leading from bore and chambers.
BRASS SCRAPER.
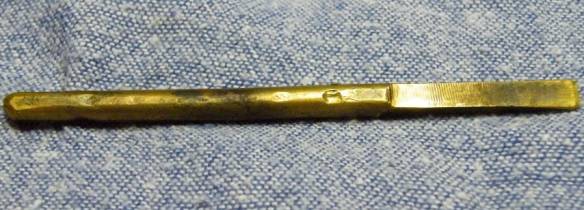
If you fire lead bullets there will be lead adhering to the area around the rear of the barrel, especially in the area between the barrel and the top strap of the frame. A brass scraper tool is handy for scraping the leading off. It will usually flake off easily. A suitable scraper can be made from sheet brass, some brass rod, or by smashing the mouth shut on a brass rifle case. File the edge of your scraper into a chisel shape.
HOME MADE BRASS LEAD SCRAPER
TOOTH BRUSHES.
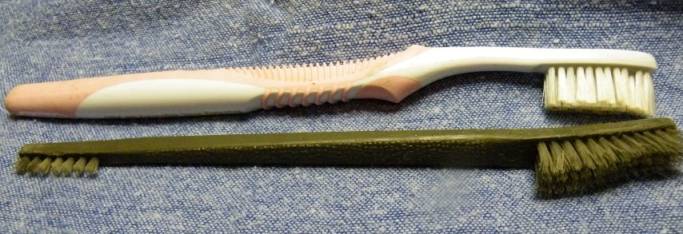
Common solvent-proof toothbrushes are used to brush away fouling from tight areas. The military type M16 double ended brush is excellent, but save your old toothbrushes for use too.
GI M16 DOUBLE END CLEANING BRUSH AND TOOTHBRUSH
LEWIS LEAD REMOVER KIT.
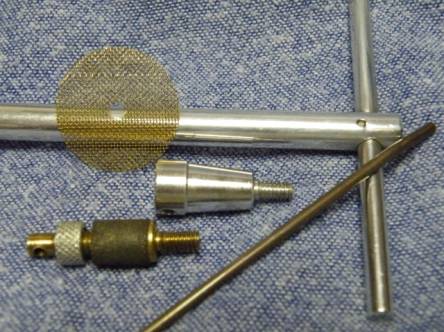
If you shoot lead bullets the bore and chambers will probably get lead deposits. The Lewis Kit was developed many years ago to clean out the leading without damaging the bore of target pistols. The kit includes a brass tip with a rubber bushing to clean the bore and a cone-shaped tip that's used to clean the fouling off the critical revolver forcing cone at the rear of the barrel. Even copper bullets will build up fouling on the forcing cone and the Lewis kit is about the only way to really get it clean. Failing to clean the forcing cone of leading or copper deposits can cause cracking of the cone and a ruined barrel.
You can buy a Lewis Kit from Brownell's.
LEWIS LEAD REMOVER KIT
BRASS BORE TIP WITH RUBBER PLUG, FORCING CONE HEAD, BRASS SCREEN
WRENCH USED TO TIGHTEN THE HEADS ON THE ROD AND TEE HANDLE ROD.
There are other ways to remove leading from a bore, one of which is to use strands of copper Chore Boy pot scrubber pads. These pads are thin pure copper ribbons coiled into a pad. To use, cut off a strip and wrap around a bore brush.
WARNING: Make SURE you get genuine 100% copper Chore Boy pads. Many of the off-brand pads are actually stainless steel with a copper plated finish. These will destroy a bore very quickly. If in doubt, check the pad with a magnet or better, use a knife to scrap a strand to see if it's actually plated with copper over steel.
LUBRICANTS.
Lubricants are one of the most debated subjects on the internet gun forums. Everyone touts their favorites advantages. The truth about gun lubrication is that WHAT you use really doesn't matter, it's that you DO lubricate. There are no "Super" lubricants and as many claims are made about gun lubes as there are about the various car lubricant additives you see advertised on those Saturday afternoon TV shows selling some high-tech magic additive. In the old days scammers sold snake oil. Today they sell gun lubricants. The truth is, just about any lubricant sold for guns is as good as any other. Many people use CLP Breakfree, which is what the military has used for years, and is noted for being a good rust preventer as well as a lubricant. The best advice on lubricants is to buy one or two and try them. However, never mix lubricants, some may not be compatible with others.
Grease is a good lubricant for some applications, including lubricating automatic pistol slide rails and revolver lock work. The advantage of grease is that it stays put, doesn't dry out, doesn't run off or wick off, and won't sling off. It can cause problems in extremely cold weather, and tends to gather grit and dust in sandy conditions. Most any good grade heat resistant grease will work as well as the very expensive gun greases. Ordinary hardware store Lithium grease is dirt cheap and works extremely well.
Some lubricants are NOT good for guns, among them is WD-40 which is not really a lubricant and is noted for drying out and turning into a gummy substance. Dry lubricants don't seem to work as well as liquid lubricants, and silicone is not a suitable gun lubricant. Powdered graphite is no longer considered to be a good gun lubricant and will seriously damage aluminum.
WAX.
To protect the outside of your Colt, you can use a good wax like Johnson's Paste Wax or Renaissance Wax. DO NOT use auto wax. Most contain abrasives to polish paint and can damage the finish of your Colt. Auto waxes also turn white.
SILICONE CLOTH.
Another way to preserve your Colt's finish is to wipe it down with a silicone cloth. You buy these or make your own.
Buy some flannel cloth at a fabric shop and wash it to remove the sizing. Cut into squares and liberally spray with an automotive silicone spray. Store in plastic bags. When the cloth gets dirty, throw it away. A dirty cloth is likely embedded with grit that can scratch your guns finish.
SOME GUN CLEANING DON'TS.
Don't mix lubricants or solvents. Some of these are not compatible and could cause problems or even damage.
Don't fail to actually read the label. Some solvents can seriously damage a gun barrel if left in too long. Most of these harsher solvents are intended for use in rifles that develop heavy copper deposits which degrade the accuracy. These are seldom needed in pistols.
Some people have used electric drills to spin brushes in chambers to clean them. While this works, there's a risk of damaging the chambers, and it usually takes more time than using a bronze chamber brush. NEVER use a drill to spin a brush in a rifled barrel. This will destroy a gun barrel in short order. While this works in smooth bore shotguns, it should never be used in a rifled bore.
Beware of advice to use non-standard materials or chemicals in fine guns. These may well work, but most have a risk associated with them. As example, some people advise to use a mixture of hydrogen peroxide and vinegar to clean leading out of bores. While this may work, it will ruin any bluing it comes in contact with, and may damage bores. In addition the mix of vinegar, hydrogen peroxide, and lead forms an extremely hazardous chemical.
It's usually faster, safer, and less messy to use a Lewis Lead Remover kit.
Don't use mercury as a lead remover. Years ago some people would plug a bore and fill it with mercury. The mercury would amalgamate with the lead and this could be brushed out. Today we understand just how dangerous mercury poisoning is and the risks are simply too high when other methods are not only safer but work faster and better.
NEVER shoot jacketed bullets from a gun that's been fired with lead bullets as a means of "blowing the lead out". Not only do pressures soar to dangerous levels, you run a good risk of bulging or ringing your barrel. Many people have done this for years with no problem, then they shoot a few more rounds than usual or use a different load, and suddenly they've ruined the barrel. When a jacketed bullet is fired down a leaded barrel, the jacketed bullet has to try to push the lead in front of it, much like a boat pushes a bow wave. If there's too much lead for the jacketed bullet to push out of the way fast enough, something has to give and what usually gives is the barrel. The extreme pressure simply causes the barrel to bulge or ring. You will hear people tell you that they've "shot the lead out" for years with no trouble, but you'll seldom have someone admit that he destroyed a good barrel doing it. The smart option is to use a bore brush or the Lewis kit to clean out leading before shooting jacketed bullets.
Don't use abrasives to clean cylinder faces. Some people insist on attempting to remove all signs of firing from a revolvers cylinder face. This staining is simply carbon stains from firing and a mix of carbon and leading, or copper fouling. If you don't want the revolver to show signs of being fired.... don't fire it. It's almost impossible to remove all traces of fouling from the cylinder, and you run a high risk of removing bluing or nickel plating, or even damaging stainless steel. Abrasives include various metal polishes, ALL of which are abrasive, Scotchbrite synthetic polishing pads, and steel wool.
If the cylinder gets a buildup that starts to interfere with cylinder rotation, then clean it. For blued guns use a brass "toothbrush" and solvent to gently brush it off. For nickel and stainless use a lead-away cloth to wipe it off. Another option for all finishes is Slip 2000 Carbon Killer, which is a safe chemical that dissolves carbon fouling.
Don't fail to protect the outside of the gun and the inside of the bore and chambers even on a stainless steel gun. Even stainless steel can and WILL rust.
NEVER run a bore brush part of the way down a bore, then try to pull it back out. This can damage the bore, it can jam the brush in the barrel, and it ruins the brush. Always run a brush all the way through and out of the barrel before pulling it back out.
"Pumping" a patch up and down the bore accomplishes nothing. A cloth patch will not polish out fouling or smooth the bore. The purpose of a patch is to carry clean solvent into the bore, and dirty solvent and fouling out. Run patches straight through the bore and out the end.
Don't use too much lubricant. A little goes a long way. Too much can mix with fouling and form an abrasive paste that can wear parts or cause sticky operation.
Don't expect most lubricants to last very long. Most lubricants tend to dry out, evaporate, or run off. Many lubricants can virtually disappear in a matter of a couple of weeks. Inspect your guns often and re-lubricate as needed.
Again, beware of advice to use non-standard cleaning tools or chemicals. You've spent a lot of money for a fine Colt, why risk ruining it because someone told you that it's cheaper or faster.
CLEANING YOUR REVOLVER
CLEANING THE BORE.
How to clean depends on whether you've been shooting lead bullets or jacketed bullets. The only difference is that you have to remove the leading first.
The first step is to use a Lewis Lead Remover to clean the leading from the bore.
Insert the "tee" handle rod down the bore.
Insert a brass screen over the threaded end of the cleaning head with the rubber bushing and form it around the bushing.
BACK THE NUT ON THE HEAD OFF. The nut should not be touching the rubber bushing.
With the tee rod down the barrel, screw the cleaning head with attached brass screen into the rod. Use the small round wrench in the kit to tighten the head snugly to the rod. If the head isn't tight on the rod, the brass screen will tear out and be ruined.
Making sure the nut on the head is not touching the rubber bushing, pull the rod and head through the bore and out the muzzle. As you pull, allow the rod and handle to rotate.
When the head comes out of the muzzle you'll see strips of lead on the brass screen. Flick them off with a blade or your fingernail.
Use the wrench to unscrew the head, put the rod back down the barrel and repeat the process.
After a couple of passes have removed most of the leading, you can very slightly tighten the nut to expand the rubber bushing to give a tighter fit in the bore. Don't tighten too tight, this ruins the rubber bushing.
After the leading is removed, you can finish cleaning any remaining bits of lead from the corners of the rifling with the bore brush.
LEWIS BORE CLEANER TIP.
NOTE THE NUT IS BACKED OFF SO IT DOESN'T TOUCH THE RUBBER PLUG.
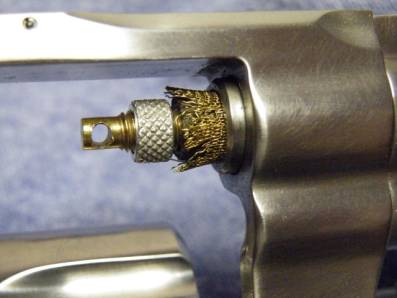
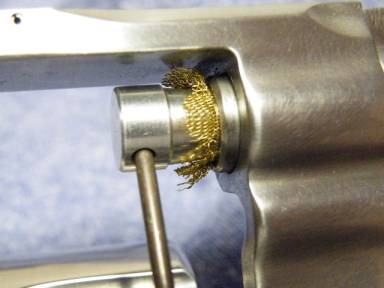
Next, put another brass screen over the aluminum cone-shaped forcing cone cleaning head. Put the rod down the bore, screw the head on the rod and tighten with the wrench.
Pull the rod so the head and screen are pulled into the forcing cone.
Maintaining a steady pull on the rod, rotate the rod clockwise a few turns.
This will clean the fouling off the critical forcing cone.
You should use the Lewis forcing cone cleaning head even if you don't shoot lead bullets. Copper and carbon fouling also build up in the cone and need to be removed.
FORCING CONE CLEANER TIP
Note the rod used to tighten the head on the rod.
After the lead is out, you're ready for normal cleaning.
Attach a bore brush to your standard cleaning rod and wet it with bore solvent, using the plastic pipette.
Insert the brush into the muzzle and run the brass cone-shaped muzzle protector into the muzzle.
Now run the brush all the way down the bore and out the end. Since the brush may spray solvent on the frame, you can wrap a piece of paper towel around the inside of the frame "window" to keep solvent off.
CLEANING ROD IN THE MUZZLE, BRASS MUZZLE PROTECTOR IN PLACE
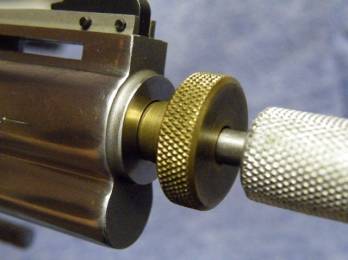
Pull the brush all the way back out, wipe off the rod with paper towel, apply more solvent and run it down the bore again, using the muzzle protector. Every time the rod comes out of the bore, wipe it off. Usually 10 passes down and back are enough to remove any remaining leading and any copper fouling.
Remove the bore brush and rinse it off to prevent the solvent from attacking it.
Attach a patch tip to the rod and put a clean patch on the tip or through the loop of the loop type.
Soak the patch with solvent and run it straight through the bore and out the end.
Attach another soaked patch and run it through.
Allow the bore to soak while you clean the rest of the gun. Again READ THE SOLVENT LABEL FOR SAFE SOAK TIMES.
CLEANING THE CYLINDER.
Most single action revolvers allow easily removing the cylinder for cleaning. Double action revolver cylinders can simply be swung out of the frame. Chamber cleaning is critical to prevent chambering and extraction problems. If you fire .38 Special ammunition in a .357 Magnum gun, fouling can build up in front of the shorter .38 Special cases and this buildup can interfere with chambering and extraction of the longer .357 Magnum cases. Always clean the chambers when switching from .38 Special to .357 Magnum ammunition.
First step is to clean the cylinder face. For normal cleaning all that's needed is to wipe the cylinder face with solvent. If there's built up fouling, use a brass toothbrush and solvent for blued guns, or a lead-away cloth for stainless or nickel. Two points here- be gentle with the nickel when using a lead-away cloth and NEVER use a lead-away cloth on a blued gun. Don't attempt to remove all traces of carbon stains, all that's needed is to remove any buildup that might cause binding between the cylinder face and the rear of the barrel.
You will also notice that there's a dark gray buildup on the outer front edge of the cylinder and in the cylinder flutes. This buildup will be worse if you've fired lead bullets. The buildup is carbon from the hot burning powder and residue of the wax lubricant that lead bullets are lubricated with. This fouling can be removed with a brass brush and solvent or the lead-away cloth on stainless or nickel.
Use a toothbrush slightly dampened with solvent to scrub the rear of the cylinder and the ejector. Lift the ejector up out of it's seat in the rear of the cylinder and vigorously scrub the under side of the ejector and it's seat in the cylinder. Once this area is clean, dry it thoroughly. Any fouling or grit trapped here can cause the cylinder to bind. The grit can be very small and almost impossible to see. If the gun is fired with grit under the ejector, the grit can embed in the metal and be difficult to get out. If necessary, use a brass toothbrush to scrub the area. To help prevent grit and burned powder particles from getting trapped, when ejecting cases hold the muzzle pointing upward so the cases and fouling will fall free.
BRUSH AND DRY THIS AREA THOROUGHLY
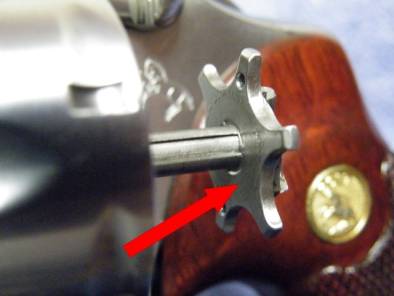
BRUSH AND DRY THIS AREA THOROUGHLY
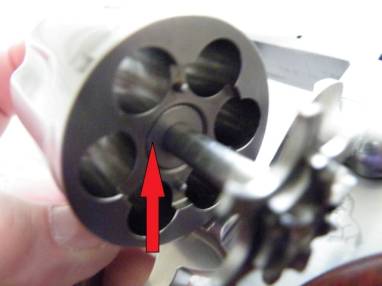
Once the cylinder face is clean, use a bronze chamber brush to clean the chambers. Soak the brush with solvent and insert it into a chamber from the rear. Push the brush through until about 1/3rd of it is projecting from the front of the chamber, then rotate the brush two to three turns. Push the brush the rest of the way through then pull it back out. Repeat for each chamber. Usually one pass is enough to clean the chamber, but if there's still fouling present, repeat until it's gone.
Install a patch tip on the rod, soak two patches with solvent and push through the chambers.
Allow the chambers to soak while you clean the rest of the gun.
CLEANING THE FRAME.
While the bore and chambers soak, clean the rest of the gun. There will be fouling on the breech face, especially at the top rear corner of the frame "window", and around the rear of the barrel. Use toothbrushes, patches, and paper towel dampened with bore solvent to remove the fouling.
BRUSH THESE AREAS TO REMOVE FOULING
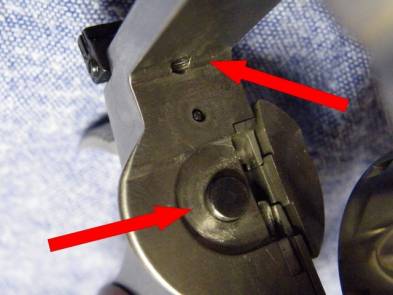
If you've fired lead bullets, use a brass scraper to gently scrape the area around the rear of the barrel to flake off the leading. Then brush with a toothbrush and solvent.
SCRAPE AND BRUSH THIS AREA THOROUGHLY
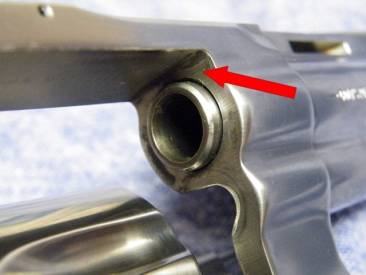
Using patches and paper towel dampened with solvent, wipe off any fouling you can find on the frame, outside of the cylinder, and end of the barrel.
After wiping with solvent, dry thoroughly with paper towel.
FINISHING UP
With the frame clean and dry, the bore should have had at least 30 minutes soak time. Wet a clean patch with solvent and run it through the barrel and out the end in one smooth pass. When the patch comes out inspect it for blue or green stains. These indicate that there's copper fouling still present in the bore. Simply allow the bore to soak a little longer. After further soaking, run another clean wet patch through and repeat until a patch comes out without staining.
When you get a clean patch out, run two clean, dry patches through to dry the bore.
Run several dry patches through the chambers to dry them. Lift the ejector up and carefully dry the underside of the ejector and it's seat in the cylinder.
Use a light or bore mirror to closely inspect the bore and chambers for any signs of fouling. If you see any fouling, you may need to go back to the brush and solvent step and clean more.
Once you have the bore and chambers clean apply a few drops of lubricant to a clean patch and run this through the bore and chambers to coat them with a preservative coat of lubricant. Then run a last, dry patch through to remove the excess lubricant. The idea is to have just a very, very thin coat of lubricant to prevent rust.
LUBRICATION
Once the pistol is clean, it's time to lubricate critical working parts:
For Colt single action revolver, put a small drop of lubricant on the ejector rod and spring assembly and operate the ejector rod to distribute it.
Put a tiny drop of lube on the hinge of the loading gate.
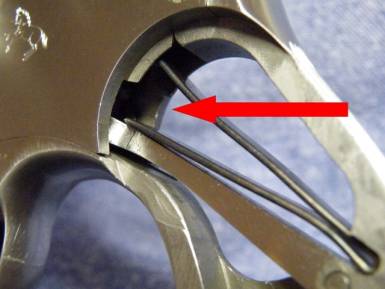
Put a tiny drop on the cylinder locking bolt in the bottom of the frame window.
Cock the hammer and put a drop down the front of the hammer.
Apply a thin coat of lubricant to the cylinder base pin and assemble the cylinder into the frame.
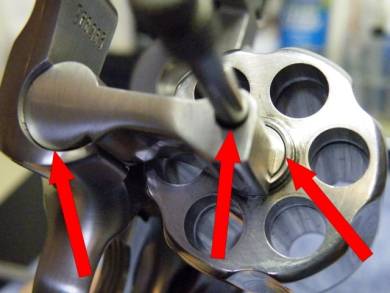
For Colt double action revolvers, put a drop of lubricant in the front of the cylinder where the crane shaft enters the cylinder.
Put a drop on the bottom of the cylinder crane where it enters the front of the frame.
Put a drop on the ejector rod where it enters the front of the cylinder crane and operate the ejector rod a few times.
LUBRICATE THESE AREAS LIGHTLY
ADD ONE DROP OF LUBRICANT DOWN THE FRONT OF THE HAMMER
With the hammer cocked, put a drop down the front of the hammer.
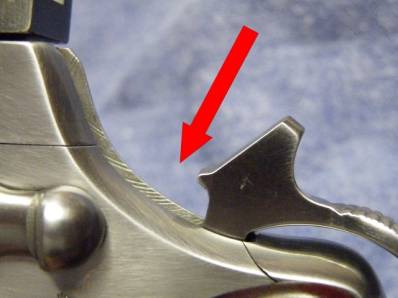
DROP ONE DROP OF LUBRICANT INTO THE FRAME
If you remove the grips, you can put a drop inside the frame from the bottom.
To protect the outside of the gun you can apply a very thin coat of lubricant like CLP Breakfree or you can use a coat of a good wax. Simply apply a coat of wax with a patch, allow to dry, then gently buff it off with a clean cloth. You can also use a silicone cloth to protect the finish, but when the cloth gets dirty looking, throw it away and get another.
An unsuspected problem with pistols, even stainless steel, is rusting and pitting under the grips. This seems to be especially bad with rubber grips because moisture and sweat seep under the grips and the rubber won't absorb it like wood often does. However, even wood will allow rusting. To prevent this, remove the grips and apply a medium thick coat of wax to the frame where the grips cover it. Allow to dry about 30 minutes, then without wiping the wax off install the grips.
To preserve and protect the revolver grips, a coat of wax works well. For rubber grips, apply a coat of Armor-All and wipe off.
Store your gun in a cool dry place on a surface that won't hold moisture and where air is free to circulate. If you store it in a gun safe, make sure you have a moisture control system in place.
Do Not store your Colt in a leather holster. This stretches the holster out, and the holster contains moisture and chemicals that can seriously damage the finish of your gun.
Do Not store guns in closets where clothes are stored. Clothing retains moisture after laundering and damp closets are notorious for causing guns to rust.
Do Not store your guns in gun cases, especially fleece lined cases. These are notorious for causing guns to rust. Foam padded cases also retain moisture and rust guns.
Do NOt store guns in the older Colt cardboard boxes or in the plastic bag the gun came in. These can cause rusting or damage to the finish.
The best protection for long term storing of a gun is in a special plastic bag with a sheet of vapor-barrier paper wrapped around the gun. This paper gives off a vapor that surrounds the metal and prevents rust for at least 10 years, as long as the special plastic bag is sealed. You can buy "Gun Wrap" brand vapor-barrier paper and "Triple Tough" brand storage bags and "Zcorr" bags from Brownell's that have the VCI material already in the bag.
WARNING: Don't use ordinary plastic bags. These will pass moisture and allow the vapor to escape. The storage bags are made of a special plastic that won't allow moisture to pass. This works better than slathering your gun with a thick coat of grease, and you can simply open the bag, wipe the barrel and chambers out and use the gun with no messy degreasing necessary.